Wednesday, July 10, 2013

It's done. For now.

So the bedroom is done for now.  Here are some pictures!

Before

After

Bed

Curtains
Throw Pillows
I shoved the old throw pillows into the bags the sheets came in.


I made the curtain's tie backs out of the ribbon that was wrapped around
the blanket as part of its packaging


Found these birds at Target and I thought they tied in some of
the colors from the curtains and sheets.
The birds are over the bed.  This is the other sheet
configuration with the cream colored sheets.
(bonus hand shadow free of charge!)

It is as done as it's going to be for a while.  I'm thinking about adding some curtain like things to the closet doors like I saw on pinterest.
And maybe some paint.  But if we're painting we might as well add trim too ... and down the rabbit hole we go.
Special thanks to Melanie who helped pull me out of my downward decorating spiral!

Tuesday, June 11, 2013

This has spun out of control

This is what we currently have.  The room is sort of dark so this worked to keep it lighter.

Master version 1

Master version 1

Master version 1

Master version 1
 
Curtains I bought from Target
Sheet set I bought from Target

This duvet cover seemed alright but it looked really messy and very gray.
Master version 2

Master version 2
 
I tried this blanket that has white and light blue in it but the blue wasn't quite right.  I did the gray blanket at the bottom and the gray pillow cases to tie it together with the gray curtains.  Still pretty blah though.
 
Master version 3

Master version 3

 This is the reverse of the original comforter.  This actually matches the blue in the botanicals print on the pillows and curtains.

Master version 4

Master version 4

This is the gray blanket instead of the duvet.  Still a little too gray.
Master version 5

Master version 5
 
 
I started with the idea of gray and yellow to work with the walls and since gray and yellow seems to be a thing now.  I couldn't find curtains or even fabric that worked with the first duvet cover so I got the gray botanicals curtains which sort of sent me down a different road entirely.
 
But now I like the botanicals print and would like to do the light colored curtains instead and keep the sheet set.  Maybe with a green or blue/turquoise coverlet.  And ditch the gray completely.
 
I want a coverlet or blanket so it's easy to wash (kids and cats)  Nothing too light colored (again, kids and cats).  But also not too dark because that makes the room too dark.
Curtains I'm thinking of getting.

Thursday, May 16, 2013

The GREAT Office Makeover!!! Part One.

I guess it's not that great, since it was mostly organizing and clearing out.  There wasn't any paint changed or anything like that.

Seems like it  all started when we moved the bookshelves from the living room to the office. 

Looks nice, right!?

The main reason I needed the shelves moved out of the living room was that they were collecting way too much junk.  But after the move, the junk was homeless and my desk became the shelter.  The desk wasn't in great shape before, and now, adding more stuff just made it reach its clutter tipping point. Then, since I couldn't get things off my desk because the closet was too messy, I decided we needed to clean out the closet. 
It's a vicious cycle.

The closet was completely out of control.  I couldn't ever get anything in or out of it because it was all in boxes stacked on top of each other.  So of course it all just ended up in huge jumbled piles right inside the door.


And because I couldn't easily get anything in or out of the closet this is what my desk looked like.


It was not pretty.  After all sorts of contemplation and a lot of pinterest searching I decided to add shelves over my desk to hold my craft and sewing supplies.  The theory being that removing those items from the closet would really help the clutter in there.
 
So I bought all sorts of storage boxes and bins and tubs and started organizing.
 
Bins of fabric
Progress!  Stuff in boxes on my desk.
 
When JR came home from China he helped by putting up the shelves.  Three shelves with room to grow!


He also put up a set of file holders to sort bills and coupons into.


And here it is all put back together.  It's not exactly styled but it was late and I only kind of care.  Sadly, this is the best it's ever going to look, so, live it up people! (person?)

 Next up, the closet.  Dun, dun, dunnnnn!


Tuesday, May 14, 2013

Done!: Shrinky Dink Jewelry

My latest pinterest project was shrinky jewelry.
Here's the original pin which takes you to the Rust and Sunshine blog.  Looks like she followed this instructable.


The idea is, you collect #6 plastic that you would normally throw in the recycling bin, have the kids draw on it with permanent marker, and then shrink it in the oven like a Shrinky Dink!  I love the idea of wearing some of their art and Shrinky Dinks are awesome, so really, there was no way I wasn't doing this.

In Rust and Sunshine's post she made a bracelet and had a piece leftover that she made a necklace out of.  I'm not really a bracelet person and since we were making these for Grandmas that weren't readily available for sizing we decided to do necklaces instead.

Most of the plastic came from fast food take out containers.  I thought we would hit the jack pot with bakery containers but they all seemed to be #1 plastic. So I've been saving for a long time.   First I cut them into big flat pieces so the kids could color on them.


Kaida did most of the heavy lifting in the coloring department.  But I made sure that Colin colored at least a little on each piece.  That was a challenge though, since, when you hand him a marker he immediately flips it over and tries to color with the wrong end.  I was going to take pictures of them coloring and include them with the necklace as a certificate of authenticity.  But I value my dining room table, chair covers, walls, linoleum, and cats too much to let my guard down for that.
 
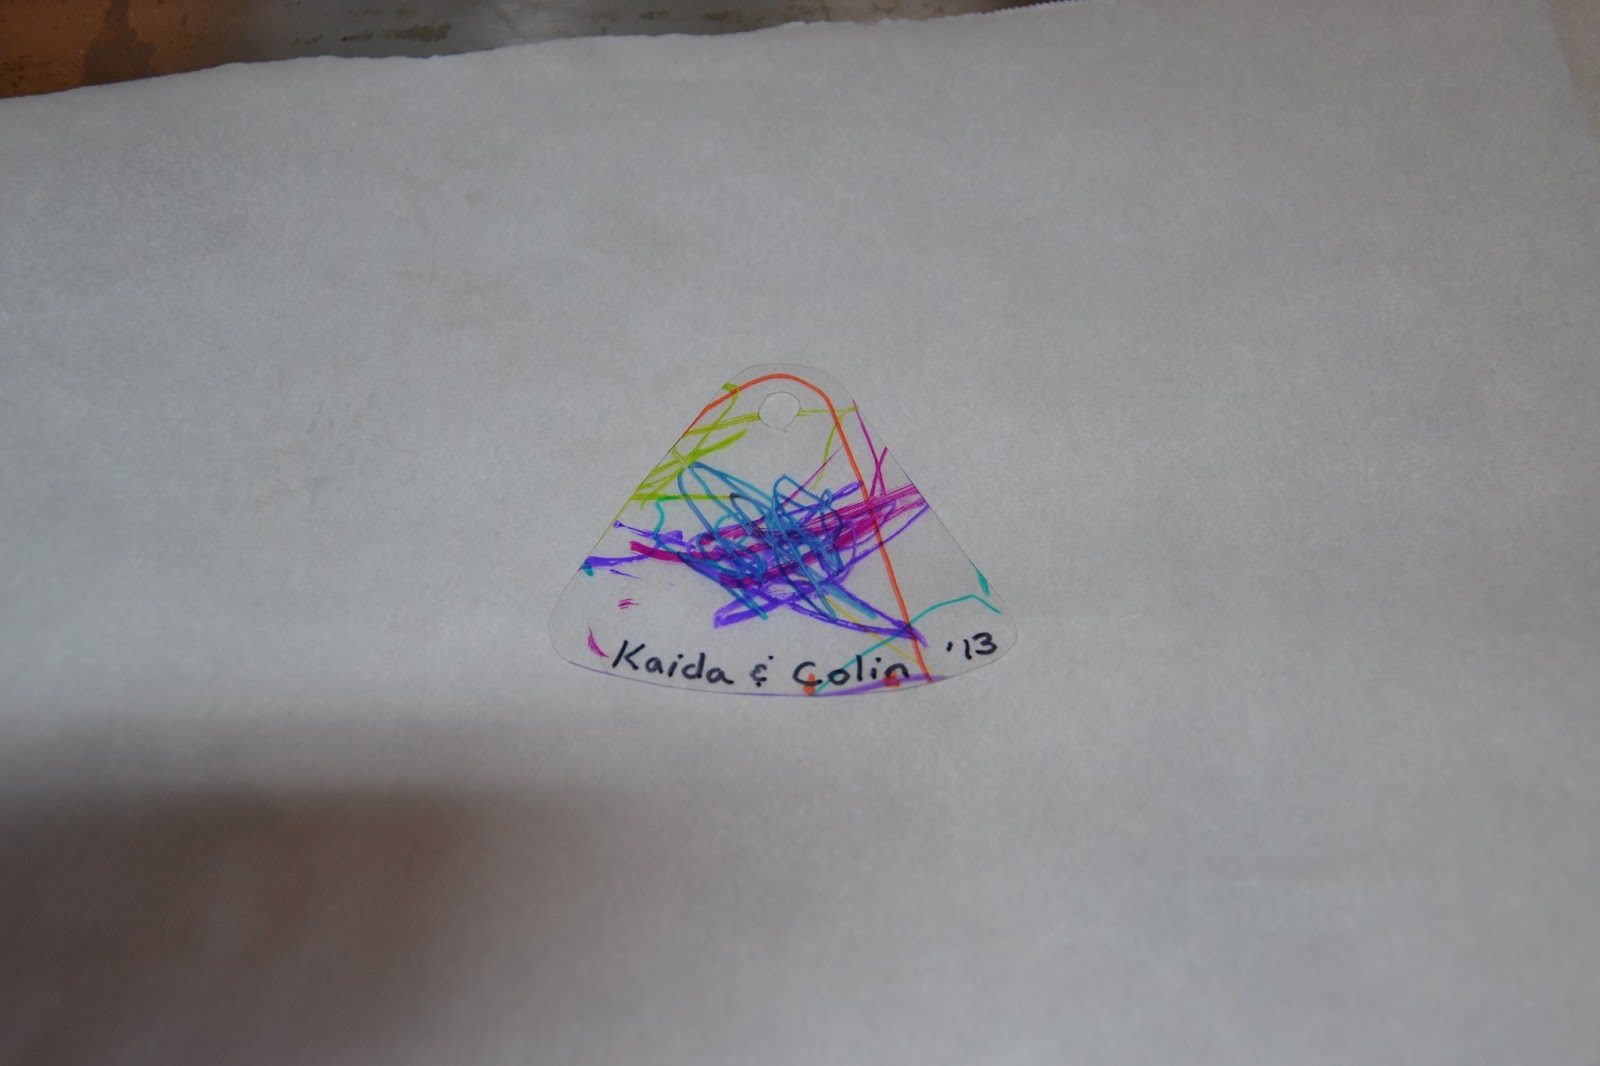
Once they were done coloring I cut out the shapes, wrote their names and the year on them, and punched a hole for the jump ring. 


Then I put them in the oven at 250 degrees for a couple minutes (Rust and Sunshine says 350 but the instructable she links to said both 250 and 225 in separate tutorials).  They curled and flattened a bunch of times and once they seemed to stay flat I took them out.  A bunch of them were sort of wavy so I needed to flatten them again with the bottom of a heavy glass, I just smushed them flat for a couple seconds.


It's kind of hard to tell how much they shrank by but I would say it was at least half.  There were some made out of a different, blue, #6 plastic that shrank a lot more.  It also turned nearly opaque  and you can't see their coloring unless you hold it up to the light.  So it's a bit of trial and error with some wishing and hoping.


I bought some jump rings and plain necklaces at Michael's and this is the final product.  We sent one to Grandmom and one to Grammy and I've worn mine almost every day.  I like it best with a plain light colored shirt or something cut a little lower so it has a plain background to display my little artists' work.


Tuesday, April 30, 2013

Done! : Broccoli Parm Penne

I've been trying a new recipe from Pinterest about once a week.  I would say they are usually ok, but generally not as good as the descriptions would lead you to believe.  We've added a few to our regular rotation but most end up being one and done.

Tonight I made Broccoli Parm Penne.  At least that's what I named it.  The pin calls it One Pot Pasta


The pin takes you to http://pinterest-healthy-foods.blogspot.com/2013/04/delicious-foods_10.html but the entire recipe that appears on the website is included in the pin's description.

"One-Pot Pasta - Martha Stewart. Boil penne 6 minutes less than al dente; add broccoli florets, and cook until penne is al dente. Drain; return to the pot, and toss with a couple of crushed garlic cloves, some olive oil, the zest and juice of a lemon, salt and pepper, and plenty of Parmesan."

It sounded good and looked easy but I'm pretty wary of pins that aren't specific so I had my doubts.

I used a whole box of penne, 3 smallish heads of broccoli, 4 or 5 garlic cloves (pushed through the garlic press), a container of fresh shredded parmesan from Giant Eagle (I have no idea how much it is, maybe 2 cups), and about 2 tablespoons of olive oil.

It was pretty easy, and surprisingly tasty.  We really liked it.  It made a huge pot and I served it with some Texas Toast.

The only thing I would change is, instead of the juice of a whole lemon I'd do the juice of half a lemon.

It looks like It really is a Martha Stewart recipe.  And the first commenter agrees with me about using half a lemon.

Monday, March 25, 2013

Done! Child's Apron and Brownie Batter Dip.

Last week I made a board on Pinterest for the projects that I've Done! (or attempted anyway).  I tried to write a comment for each of the projects telling how they worked out.  That way in two years when I look at it again and say, "Oh I've made this before, I wonder if it was any good?"  I'll look at my notes and see that it was terrible or I should really make sure to have all the supplies ready before I start.

So I'm going to feature a few I've done and tell how they worked out.

I guess I'll start with the one I think turned out the cutest.  It's the Child's Apron Tutorial.


Which takes you to http://creatingbycami.blogspot.com/search/label/Child%27s%20Apron%20Tutorial

I made this for Kaida for Christmas.  I think it came out very cute.  I used fabric left over from the throw pillows and curtains in her room.  I didn't have enough left to make the hat though, so sad.  The tutorial was pretty easy to follow.  I had a little trouble with the ruffle at the bottom but I've never done a ruffle at all before.  And it worked out in the end!


She loves it and always wants to wear it to help me in the kitchen.  Even when we're just making toast.  I'm wondering about scaling it up to make a cute apron for me!

The next one is this Brownie Batter Dip.


The recipe is found at http://stickafork.net/2013/01/brownie-batter-dip/

I made this for JR and me to eat during the Super Bowl.  It wasn't too hard to make, since there's no oven or stove involved.  But it didn't really taste like brownie batter.  It tasted like too thick chocolate cream cheese frosting.  JR liked it which was a little surprising since he's not a big cream cheese fan.  I'm sort of wondering if I could just take a brownie mix, change the oil out for butter, reduce the water, skip the egg, and have a dip that actually tastes like brownie batter.  Might be worth a try, if there's ever a reason to make something that yummy and bad for you.

Oh, and mine totally looked as adorable as the original picture, I definitely didn't serve it in a cereal bowl with the pretzels still in the bag while we ate it on the couch.

Wednesday, March 13, 2013

The Great Closet Clean Out - 2013

One of our first spring cleaning tasks was to get rid of the pile of goodwill donations that's been growing in our room since Kaida was born (that's the last time we made a donation).  I think you have to itemize everything if you want to claim it on your taxes now. This is an extra step in the process that, apparently, takes two years to complete.

This donation was just clothes.  I brought the pile down to the living room and we added everything into It's Deductible which is related to turbo tax.  Then I naively said "Maybe we should go through our closets really quick to see if there's anything else we want to send."

Five and a half hours later (that includes a lunch break) we had an extra bag to take over.

But the good news is that I had already gotten rid of most of my clothes that didn't fit anymore!  So there wasn't a lot to donate just because it was too tight or small.  That was a nice confidence booster.  And actually some of it was kicked out because it was too big.  I really have no idea why I would keep something that never fit.  I guess I'm a little crazy.

The sad news is that my closet is still pretty full.  I kept a lot of my office appropriate attire on the chance that I'll be working in an office again sometime soon.  Plus I can wear most of those things to church too.  I really don't need that many nice outfits but I don't want to get rid of them either.  I did just need to dress up for Jury Duty last week so there are things sometimes.

The good news is that I'm not too worried about fashion trends, as long as I look good in it I'm usually ok with it.  So those clothes can stay in my closet a long while and get occasional use before I deem them past their best by date.  Besides, shopping isn't as fun without Rachelle's reckless encouragement so I'd be lost if I had to go get something new by myself.

I found a few things that had gotten shuffled to the back of the closet and I've been working them into my every day SAHM wardrobe.  JR is pretty excited that I'm no longer alternating between the Mickey Mouse sweatshirt with the broken zipper, and the Mickey Mouse sweatshirt with the green stain.

It was like shopping in my own closet. 
Plus making a three garbage bag donation.
Plus de-cluttering.

It was a good day.

Monday, March 11, 2013

Bedroom Furniture

We re-arranged our bedroom furniture last week.  It's a dark room and the side where JR was sleeping is very dark.  His theory was that seeing a little light early in the morning would help him get up and out of bed.  So we went for it.

The entire room is a little awkward.  It's big but it has a knee wall on one long side.  Then there's the dormer that sticks out from that same wall making a little alcove.  And we have a radiator with built in shelves above it on the opposite wall.

(Click to embiggen)
This is totally not to scale and only a little bit accurate.  Since there's a hallway closet that abuts JR's and that would definitely not fit into this picture.  But you get the idea.

Anyway, here's how we used to have the furniture.
(Click to embiggen)

 
As you can see JR's side of the bed (by the closets) was as far from the windows as you could get.  Also my night stand hung over the alcove opening a bit and there was a lot of empty space on my side of the bed compared the JR's barely-wide-enough-to-walk space.  And with the treadmill in the alcove I couldn't get in there to open the window or curtains.

 
When we first rearranged everything we ended up with this:
(Click to embiggen)


The only weird part of this, to me, was the line of furniture against the knee wall.  Chaise, armoire, night stand, dresser.  The chaise sticks straight out from the alcove when I prefer it on an angle where ever it is.  Plus it's weird to have a night stand not near a bed anyway and this is just a straight line of matching furniture and that's what bothered me.  Everything sticks out almost the same distance from the wall.
JR didn't like the treadmill next to the dresser on his side of the bed either.

So after a couple days we tried again and ended up here:
(Click to embiggen)

So now the weirdness is still the chaise, JR's dresser and my dresser overlap a little, and his night stand is still on the other side of the room from his side of the bed.

I feel like if the radiator were underneath the window and we didn't have these built in shelves (they're not even really nice), everything would just fall right into place and it would be great!

But I still like it better than it was.  It feels better balanced I guess.  You know the feng shui and all that.  And I've been sleeping great!
JR thinks he likes it too.  We're going to give it a little longer before we pass final judgement.